Converting the Revell Flower Class Corvette to Radio Control
Lessons learned...
|
 |
In 1990, I built the HMCS Snowberry as an RC model. At the time, I was
the RC Scale Boats columnist for Flying Models magazine, and I described
the conversion of the model in three consecutive columns. At the time
that I built mine, I was a member of an active RC boat club in the Seattle
area. I was able to draw on several club members' experiences with the
kit, in addition to my own.
With Revell's re-release of the model, there's a lot of interest in
converting it to RC. I've seen some of the same questions and concerns
coming up again. (There's a whole new crop of builders figuring out how
to RC it for the first time.) I sold my model in 1993, before a cross-country
move. I recently found a stash of photos taken when I was preparing the
magazine articles, which sparked my memory.....
Here are some observations and lessons learned from my experiences
with this kit as a RC model, in no particular order.
-
I built my model pretty much OOB, with some minor improvements to
the detailing. I did relatively minor things like drilling out the
gun barrels, adding folded flags to the flag locker, and adding ropes
and block&tackle assemblies to some of the J-davits.
-
Next time, I'll do more detailing.
-
Probably a lot more. (I now own John Lambert's book!)
-
I powered my model with a 6 volt drive system. I used a 6 volt
4.5 amp-hour gel cell battery. I like 6 volt systems because I can
power the radio with the main battery. I don't remember for sure,
but I think I measured the power consumption of the Dumas motor at
about .5 amps max. This meant the battery could in theory last 8 -9
hours. (I never needed that much time.)
-
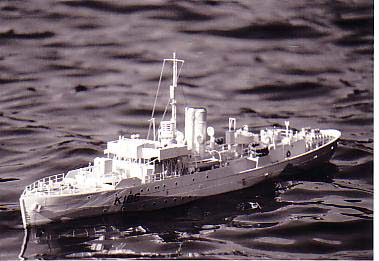
The model is a reliable performer in the water, and handled fairly
rough seas quite well. The model was stable, a little faster than
scale, and handled reasonably well for a single screw ship.
-
My Matchbox kit offered three options: USN, RN, or RCN. I picked
the Snowberry because I had served as a First Lieutenant aboard a
USCG Cutter, and I knew the effects of salt water corrosion on white
painted ships. I KNEW what running rust should look like!
-
I spent a lot of time fixing all the out-of-round molded parts
like depth charges and small ventilators. It looks to me like the
current Revell offering is better than the old Matchbox kit in this
regard.
-
I added working lights to my model. I had port and starboard running
lights, and a white light at the top of the mast. My RC club had annual
dusk/night runs, and I wanted to participate. I made one of the deck
lockers removeable. Underneath it was a toggle switch to activate
the lights.
-
I made the center section of the deck removeable for access to
the hull. Others I know also made the engineroom casing removeable,
but I didn't, and didn't need it.
-
I built gutters under the seam between the foc'sle deck and the
removeable section. Any water getting on the foc'sle deck could not
drain into the hull – instead the gutter collected the water
and dumped it on the main deck aft.
-
The main deck aft was not removeable. I made sure it was watertight,
as water could (and often did) end up on it.
-
I originally purchased a Graupner 3:1 gear reduction unit for use
with a Mabuchi motor. (I think Hobby-Lobby still carries this unit.)
This was a terrible choice. The unit is a plastic housing with plastic
gears. Mounted firmly in the hull, all of the vibration form the gear
box was transferred to plastic hull, where it resonated in the big
hull. The model sounded terrible on the water. Also, it was slow-it
could only make about 2/3 of what looked to be scale max speed.
-
I replaced the motor with a Dumas 6 volt Pittman motor, and coupled
it to the prop using direct drive. (No gears.) This was a perfect
match for the model, and the setup I'd use again. I now could go faster
than scale speed if I needed to.
-
RC models get handled, sometimes a lot. All that launching and retrieving
leads to things getting broken. I found the stock plastic railings
to be a bit fragile. Next time I'll make the stanchjions and rails
form brass rod. I'll also replace some of the J-davits with brass
rod- styrene is jjust too easy to break, and difficult to repair.
-
I wish Matchbox had molded the kit in white instead of gray plastic.
Painting all the little deck lockers, vents, etc. was a pain. I couldn't
get decent coverage of white by brush painting. (I didn't own an airbrush
then. I eventually painted the model with cans of cheap flat white
spray enamel from the local home center, which worked out OK.
-
I found the Snowberry's camouflage to be surprisingly effective,
especially on a rippled lake on a sunny day. The model would start
to blend in when a hundred feet or so offshore. I seldom went that
far out with it-I didn't want to get rammed by another boater who
didn't notice me.
-
I used lead shot, mixed with epoxy, to ballast the model. This
sludge was poured along the keel in the bottom of the bilge, which
got the weight as low as possible. The model was quite stable as a
result.
-
Don't make every last ounce of ballast permanent, ballasting the
completed model exactly to the waterline. Just like real ships, future
yard periods may add additional equipment, so you'll want to be able
to remove some ballast to compensate for the slightly heavier new
battery you just bought.
-
I put the on/off switch for the radio under the engineroom skylight,
which was not glued down. This way I could turn the model on and off
easily, at the water's edge. Put the removable piece on a lanyard,
so you can't lose it overboard.
-
I mounted my radio equipment on sheet styrene platforms near the
bottom of the hull. The idea is to keep the radio dry in case you
get a little bit of bilge water sloshing around.
-
I later added a retractable pin to one of the foc'sle bitts. I
could run a line (heavy thread) with a loop in the end through the
bow chock and onto this pin that was against the bit. The pin was
connected to the rudder servo, so that full left rudder, plus full
trim, would cause the pin to retract into the deck, releasing the
line. This allowed me to moor the model to a mooring buoy or dock,
and then release the line and get underway by remote control.
-
Don't get caught up with a lot of math trying to calculate and
measure "scale speed". Pay attention to the wave form. A displacement
hull at max speed has a certain wave form that is recognizable. When
the model approaches this wave form, it "looks" like it is going at
full "scale speed", no matterwhat the calculations say.
-
Make sure the model is seaworthy. I make sure all of my RC ships
can roll 90 degrees (at least) without anything shifting around inside
the model. You may think you'll never run your model on a rough sea,
but consider this. I saw a model tug sink once, in calm water. It
was hit by another model, and rolled about 45 degrees. No real damage
was done to the sturdy hull. Problem was, the battery was not hitched
down, so the force of the collision caused it slide against the side
of the hull. This left the model with a severe list, putting the seam
for the removeable deck under water. The owner headed for shore, but
the model foundered about ten feet offshore. (Fortunately it was easily
recovered.)
That's all I can think of for the moment. I'm sure I'll remember more
when I start working on my new Corvette.
|