White
Ensign Models 1/700
Flower Class Corvette
HMS Buttercup
Introduction
The story of the Flower Class corvettes begins with the realisation
that Britain was lacking in ships capable of providing escort to convoys
in the case of war . . a war which was clearly on the horizon. Therefore
the Admiralty approached the company of Smith's Dock to come up with a
design for an escort that would be able to be built in a hurry, and by
yards with no experience in building to naval standards. Smith's Dock
revised the design of a whaler named the Southern Pride and came up with
what was to be the classic small ship of the Second World War - the Flower
Class Corvette.
 The
original Flower was to undergo many changes following operational experience.
These included redesign of the bridge, lengthening the foc's'le to provide
better habitability for the crew, additional depth charges, radar. By
war's end the Flowers had metamorphosed from a quaint-looking two masted,
short foc's'led vessel with a pop-gun on the bow to a more purposeful
and warlike vessel. However by this time the corvettes were being replaced
by newer frigates which were much more suited to the job, and the Flowers
were quickly disposed of. Only one survives to this day – HMCS Sackville
in Halifax, NS. The
original Flower was to undergo many changes following operational experience.
These included redesign of the bridge, lengthening the foc's'le to provide
better habitability for the crew, additional depth charges, radar. By
war's end the Flowers had metamorphosed from a quaint-looking two masted,
short foc's'led vessel with a pop-gun on the bow to a more purposeful
and warlike vessel. However by this time the corvettes were being replaced
by newer frigates which were much more suited to the job, and the Flowers
were quickly disposed of. Only one survives to this day – HMCS Sackville
in Halifax, NS.
 I
have long been interested in the Flower Class corvettes – ever since
seeing an article in volume 1, issue 1 of the defunct Scale Ship Modeler
on a large scale scratchbuilt one. To an impressionable 12 yr. old this
was amazing. .. shortly after I saw "The Cruel Sea" on late
night TV. .. that was it. . I had to have one .. sadly the only kit I
knew of was the Matchbox 1/72 . . and that was far too rare to come here
(*mail order was unknown). I
have long been interested in the Flower Class corvettes – ever since
seeing an article in volume 1, issue 1 of the defunct Scale Ship Modeler
on a large scale scratchbuilt one. To an impressionable 12 yr. old this
was amazing. .. shortly after I saw "The Cruel Sea" on late
night TV. .. that was it. . I had to have one .. sadly the only kit I
knew of was the Matchbox 1/72 . . and that was far too rare to come here
(*mail order was unknown).
 Fast
forward to late last year and I received a card to pick up a parcel at
the post office on Friday morning .. what could it be? I rushed down and
it wasn't there ... come back later. .. ARRRGGGHHHHHHHH .. I mentioned
this to a friend on ICQ and he said. .. "go back" ... oh? Curiosity
got the better of me and I went back out into the sleety rain and came
home with a small parcel from WEM
... Upon opening it I found that it was a gift and my friends had
ordered TWO of the WEM Flowers for my birthday. .. WOW !!!! I then spent
a weekend hemming and hawing over which one to build first. Fast
forward to late last year and I received a card to pick up a parcel at
the post office on Friday morning .. what could it be? I rushed down and
it wasn't there ... come back later. .. ARRRGGGHHHHHHHH .. I mentioned
this to a friend on ICQ and he said. .. "go back" ... oh? Curiosity
got the better of me and I went back out into the sleety rain and came
home with a small parcel from WEM
... Upon opening it I found that it was a gift and my friends had
ordered TWO of the WEM Flowers for my birthday. .. WOW !!!! I then spent
a weekend hemming and hawing over which one to build first.
The Kit
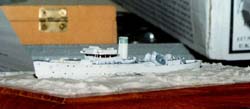 The
first thing to do was to wash all the parts to remove any trace of release
oils on the parts. When dry I then CAed the two halves of the hull together.
This was followed by drilling a hole into the bottom and shoving a push-pin
into the hole as a hand hold. Right from the start I planned to mount
this on a wooden base with a 3D seascape instead of my previous painted
cardboard bases. My choice centered on a wooden light switch plate, and
I worked on the base concurrent to building the ship, however I will describe
the base at the end. The
first thing to do was to wash all the parts to remove any trace of release
oils on the parts. When dry I then CAed the two halves of the hull together.
This was followed by drilling a hole into the bottom and shoving a push-pin
into the hole as a hand hold. Right from the start I planned to mount
this on a wooden base with a 3D seascape instead of my previous painted
cardboard bases. My choice centered on a wooden light switch plate, and
I worked on the base concurrent to building the ship, however I will describe
the base at the end.
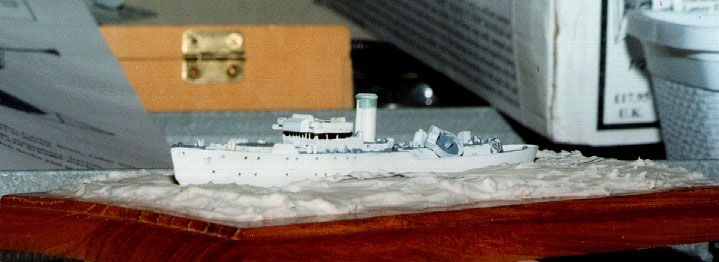
 The
hull went together well enough, except the two halves didn't align quite
right, the bottom half had had more material removed than required and
there was a slight lip where the two mated. Therefore I used filler and
sanded it smooth. When done I again washed the hull in preparation of
painting. The
hull went together well enough, except the two halves didn't align quite
right, the bottom half had had more material removed than required and
there was a slight lip where the two mated. Therefore I used filler and
sanded it smooth. When done I again washed the hull in preparation of
painting.
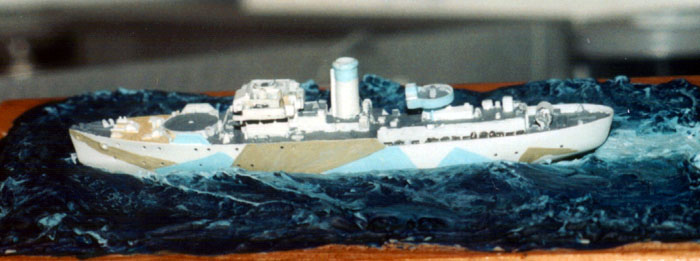
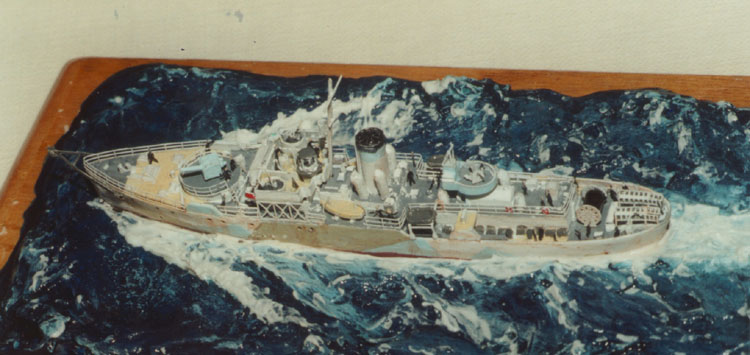
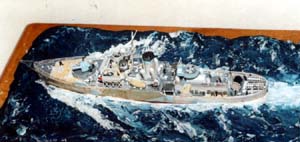
I had originally thought about trying a new idea to weather this ship
and gave it a coat of medium gray made from Testors white and a few drops
of black. Over this I sprayed white with a drop or two of black to give
it an off-white appearance. The bridge, bandstand, funnel and the photoetch
fret were also sprayed at the same time. Other parts were brush painted
as needed.
 Next
up was the camouflage on the hull. I first tried to mask and spray this,
but the pieces were just too small, so I ended up handpainting the WA
Blue and WA Green on the hull, funnel, 4" gun and bandstand. Both
the WA Blue and the WA Green were my own mixes starting with Testors white
and various other colours (sky blue, green, black) mixed in. I allowed
one day between colours, and when dry I then attempted to mask the lower
hull to spray the bottom. This time the curves defeated me, so I ended
up handpainting it again using Ceramcoat paints. For the hull bottom I
used a bright red with black to darken and tint it. The decks were painted
using Humbrol 72 on the wooden areas and a medium grey on the metal decks.
The final prepainting was the windows around the bridge. Next
up was the camouflage on the hull. I first tried to mask and spray this,
but the pieces were just too small, so I ended up handpainting the WA
Blue and WA Green on the hull, funnel, 4" gun and bandstand. Both
the WA Blue and the WA Green were my own mixes starting with Testors white
and various other colours (sky blue, green, black) mixed in. I allowed
one day between colours, and when dry I then attempted to mask the lower
hull to spray the bottom. This time the curves defeated me, so I ended
up handpainting it again using Ceramcoat paints. For the hull bottom I
used a bright red with black to darken and tint it. The decks were painted
using Humbrol 72 on the wooden areas and a medium grey on the metal decks.
The final prepainting was the windows around the bridge.
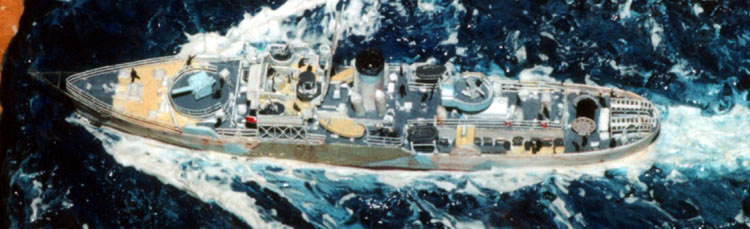
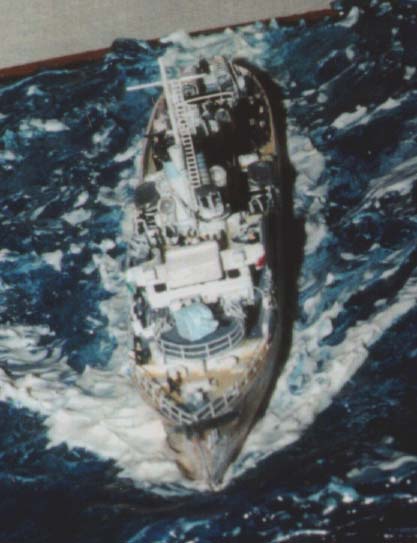
 With
the hull painted, it was time to start putting it all together. First
off I glued the bridge and radar shack onto the superstructure. I then
added the lattice bridge supports below the bridge wings. Next I added
the photoetch rails to the bow section in one piece forward of the splinter
shield. Aft of the shield I had to choose between accuracy (placing them
behind the lattice structure) or aesthetics (leaving the lattice more
visible). I chose the former and placed the rails in one piece from the
shield to the davits. However a day or so later I decided to change it
and removed these rails, cut them down in size and replaced them on either
side of the lattice supports. With
the hull painted, it was time to start putting it all together. First
off I glued the bridge and radar shack onto the superstructure. I then
added the lattice bridge supports below the bridge wings. Next I added
the photoetch rails to the bow section in one piece forward of the splinter
shield. Aft of the shield I had to choose between accuracy (placing them
behind the lattice structure) or aesthetics (leaving the lattice more
visible). I chose the former and placed the rails in one piece from the
shield to the davits. However a day or so later I decided to change it
and removed these rails, cut them down in size and replaced them on either
side of the lattice supports.
 The
depth charge racks went together far easier than I expected. The sides
fold down from the top and then resin depth charges are CAed underneath
this. These were CAed to the stern. . next time I'll do these last as
I knocked one or the other of them off more than once. The
depth charge racks went together far easier than I expected. The sides
fold down from the top and then resin depth charges are CAed underneath
this. These were CAed to the stern. . next time I'll do these last as
I knocked one or the other of them off more than once.
 The
rails were then added to the engine room casings, followed by the bandstand
and the vents. Care must be taken as the vents interfere with the bandstand
if the bottoms are not right flat. The funnel was CAed in place and the
vents added there as well. These ones will not fit as designed. Therefore
the boxes on the casing need to be removed and the locator pin on the
bottom of the vents removed. The
rails were then added to the engine room casings, followed by the bandstand
and the vents. Care must be taken as the vents interfere with the bandstand
if the bottoms are not right flat. The funnel was CAed in place and the
vents added there as well. These ones will not fit as designed. Therefore
the boxes on the casing need to be removed and the locator pin on the
bottom of the vents removed.
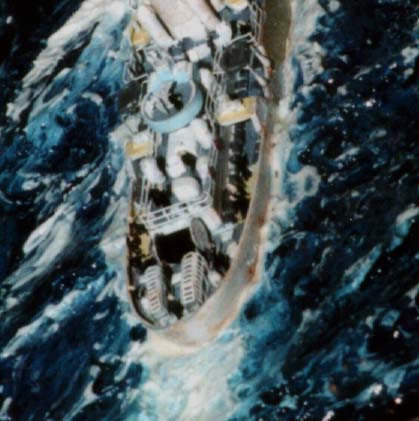
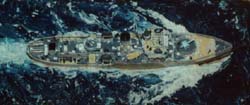
 Carley
float supports were next, and then the splinter shield beside the bandstand.
The ends for the minesweeping winch were followed by the 2pdr pom-pom
in the bandstand. The boats were CAed in place and the davits placed on
either side of them. The rest of the hull details were then added: Depth
charge davits, hedgehog, galley pipe, Oerlikons. Carley
float supports were next, and then the splinter shield beside the bandstand.
The ends for the minesweeping winch were followed by the 2pdr pom-pom
in the bandstand. The boats were CAed in place and the davits placed on
either side of them. The rest of the hull details were then added: Depth
charge davits, hedgehog, galley pipe, Oerlikons.
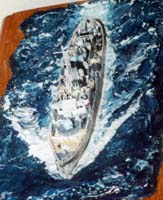 The
fun part now began - weathering. I used multiple washes of Rustall on
the hull and superstructure, followed by fine streaks of rust. When done
the change from a pristine showboat, to a weather-beaten escort was amazing.
I had originally planned to further weather Buttercup by scratching away
some of the camouflage paint and reveal the undercoat. To this I was going
to add blotches of rust, but I couldn't bring myself to do so. .. perhaps
on a larger model. However there were a few chips on the bow by accident,
and they do add to the look. . so I will definitely have to try it in
the future. The
fun part now began - weathering. I used multiple washes of Rustall on
the hull and superstructure, followed by fine streaks of rust. When done
the change from a pristine showboat, to a weather-beaten escort was amazing.
I had originally planned to further weather Buttercup by scratching away
some of the camouflage paint and reveal the undercoat. To this I was going
to add blotches of rust, but I couldn't bring myself to do so. .. perhaps
on a larger model. However there were a few chips on the bow by accident,
and they do add to the look. . so I will definitely have to try it in
the future.
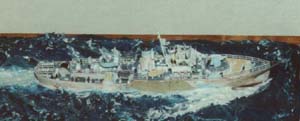
The penultimate assembly added was the mast. Thin brass rod was cut
to length and a piece of .010" guitar string was used for the yard.
The crowsnest (described by WEM "as the piece you have been wondering
about") and a ladder were then attached and the ship was basically
done .. except for the acoustic hammer on the bow.
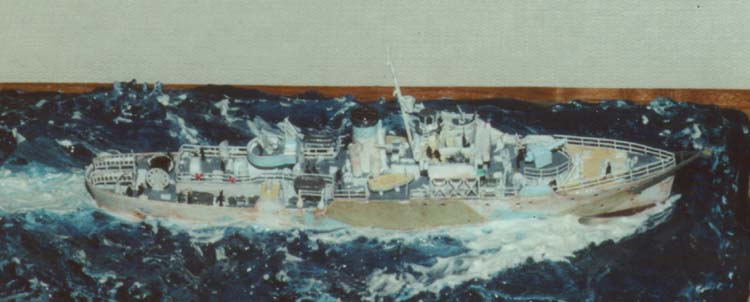
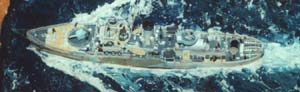
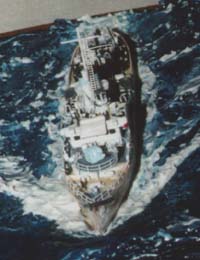
 HMS
Buttercup was one of a handful of corvettes specially fitted as minesweepers.
In addition to the more usual wire sweeps with paravanes at the end, she
also had an 'acoustic hammer' at the bow. This was a metal bucket mounted
at the end of an 'A' frame. The frame was lowered in to the water and
a metal weight then struck the bucket, hopefully detonating any acoustic
mines in the area. WEM provide this in resin and photoetch – they
recommend the PE 'A' frame and the resin bucket. I used the PE version
alone. HMS
Buttercup was one of a handful of corvettes specially fitted as minesweepers.
In addition to the more usual wire sweeps with paravanes at the end, she
also had an 'acoustic hammer' at the bow. This was a metal bucket mounted
at the end of an 'A' frame. The frame was lowered in to the water and
a metal weight then struck the bucket, hopefully detonating any acoustic
mines in the area. WEM provide this in resin and photoetch – they
recommend the PE 'A' frame and the resin bucket. I used the PE version
alone.
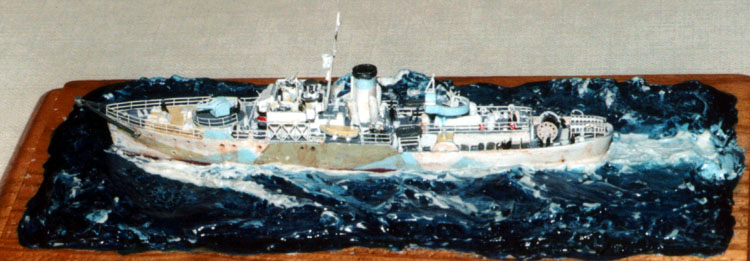
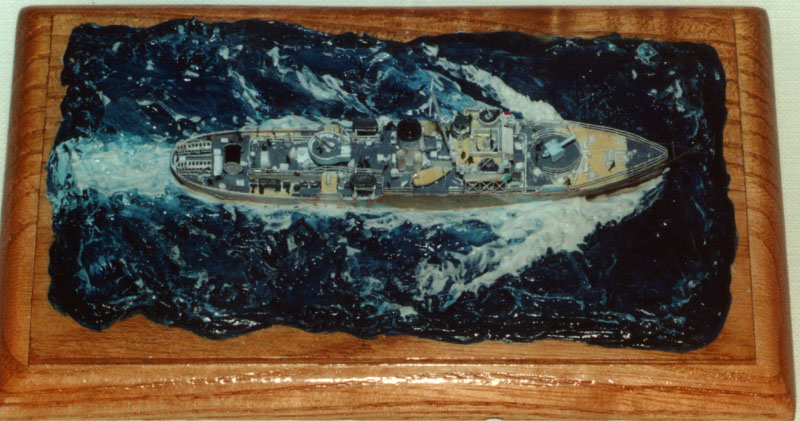
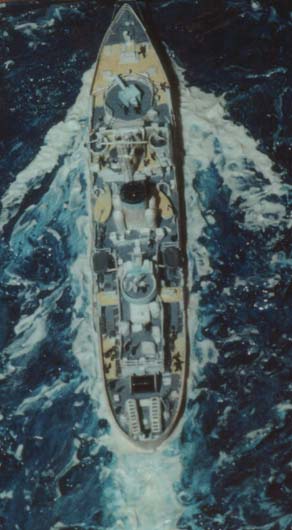
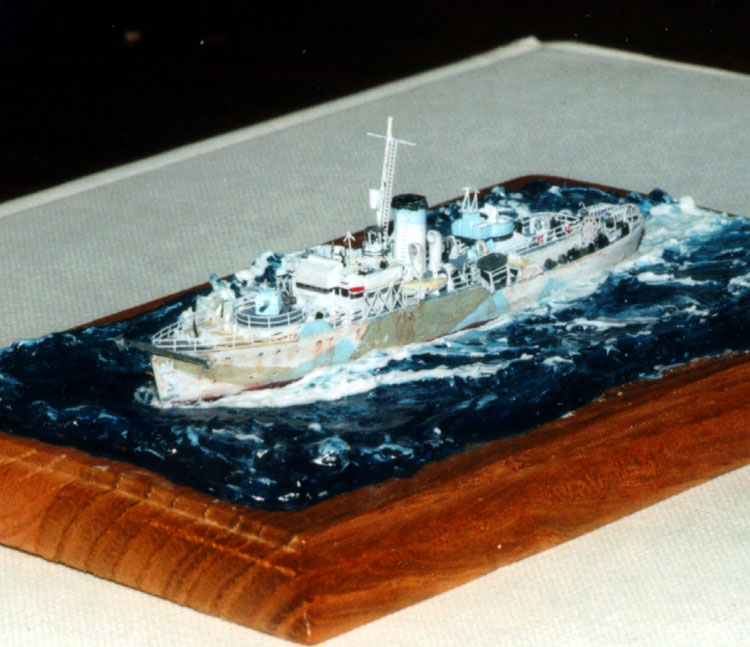
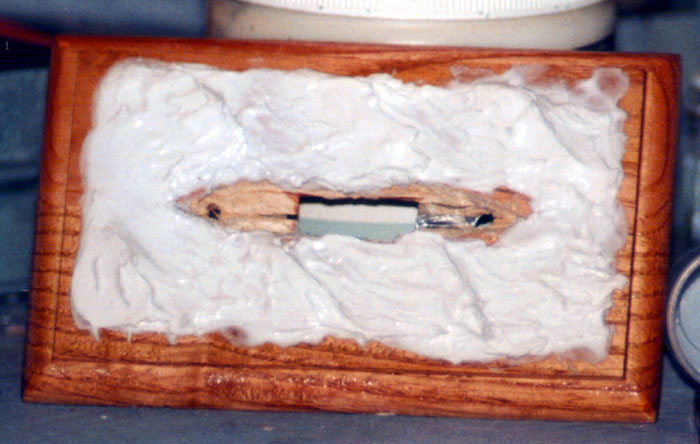
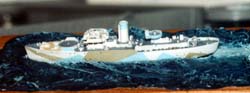
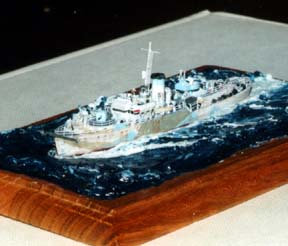
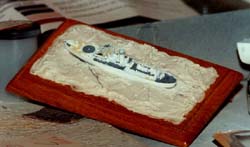
The Base
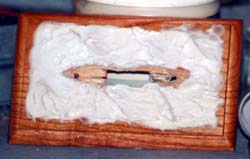 The
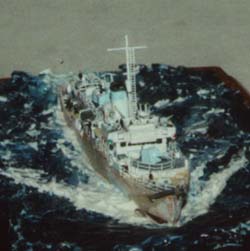
only way to show off a Flower class corvette is at sea, and not a calm
sea either. Therefore for this model I felt it was time to try a 3D seascape
rather than my usual painted box. I had a wooden lightswitch plate that
was the perfect size to display the corvette. The first step was to prepare
the area where the ship was to go. I traced the outline of the hull on
the front of the plate and began to carve the wood away, placing the hull
in it from time to time to check the fit. . . Once this was done I usually
left the hull in the space to work on it. At least until I added the 'water'. The
only way to show off a Flower class corvette is at sea, and not a calm
sea either. Therefore for this model I felt it was time to try a 3D seascape
rather than my usual painted box. I had a wooden lightswitch plate that
was the perfect size to display the corvette. The first step was to prepare
the area where the ship was to go. I traced the outline of the hull on
the front of the plate and began to carve the wood away, placing the hull
in it from time to time to check the fit. . . Once this was done I usually
left the hull in the space to work on it. At least until I added the 'water'.
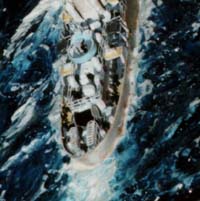
 The
water was made using Hyplar Acrylic Gel Medium, this is a paste-like substance
that is easily applied, but hard to work with unless the tools are kept
wet to prevent sticking. I covered the plate with about 1/8" of gel
and then worked in some large swells. As these dried I added more gel
and more waves, with the wake being roughed out as well. Once I had a
basic waveform I liked it was time to add colour using Ceramcoat acrylic
paints. The
water was made using Hyplar Acrylic Gel Medium, this is a paste-like substance
that is easily applied, but hard to work with unless the tools are kept
wet to prevent sticking. I covered the plate with about 1/8" of gel
and then worked in some large swells. As these dried I added more gel
and more waves, with the wake being roughed out as well. Once I had a
basic waveform I liked it was time to add colour using Ceramcoat acrylic
paints.
 I
first painted the entire sea in Navy blue, when dry this was followed
by spots of Prussian blue and a very light wash of Cerulean blue. I then
went back with more Navy blue and white. . all this while the previous
colours were still damp. This allowed the illusion of various 'layers'
to appear in the flat sea. I then mixed up some gel with white paint (in
case the gel discolours in time), and lined the cavity with this mixture,
the hull was then placed into it and the wake sculpted into place. Extra
dollops of the mixture were brushed on the wavetops to show some whitecaps.
Final step was to give the water a couple coats of Future to impart a
nice sheen to it, and to add the 1/700 Tom's
Modelworks PE crewmen. I
first painted the entire sea in Navy blue, when dry this was followed
by spots of Prussian blue and a very light wash of Cerulean blue. I then
went back with more Navy blue and white. . all this while the previous
colours were still damp. This allowed the illusion of various 'layers'
to appear in the flat sea. I then mixed up some gel with white paint (in
case the gel discolours in time), and lined the cavity with this mixture,
the hull was then placed into it and the wake sculpted into place. Extra
dollops of the mixture were brushed on the wavetops to show some whitecaps.
Final step was to give the water a couple coats of Future to impart a
nice sheen to it, and to add the 1/700 Tom's
Modelworks PE crewmen.
Conclusion
All-in-all the White
Ensign Model Flowers are a fun, easy build that serve as a great introduction
to resin and photoetch. There are some flaws in the kits, but these are
easily overcome and will result in a great looking model that takes up
a minimum of space.... If asked what do I like best about them? The answer
must be that I still have one to do.
|