Converting the Matchbox/Revell 1/72 Flower Class Corvette Part
5:
4" Mk.IX and Mk.XIX Guns
|
 |
Introduction
For those who have been following this occasional series of articles
I am in the process of building three of the Matchbox/Revell Flower class
corvette kits. The first is being backdated to HMCS Wetaskiwin, a short
focsle Canadian corvette. The second is being updated to HMCS Cobourg,
a late war Increased Endurance corvette. Both require a fair number of
changes from the stock kit, including: new shortened engine room casing,
resited galley, new bridge structures, new hull shapes, new weapons as
well as numerous minor details as well. This time we shall focus on 4"
guns for both.
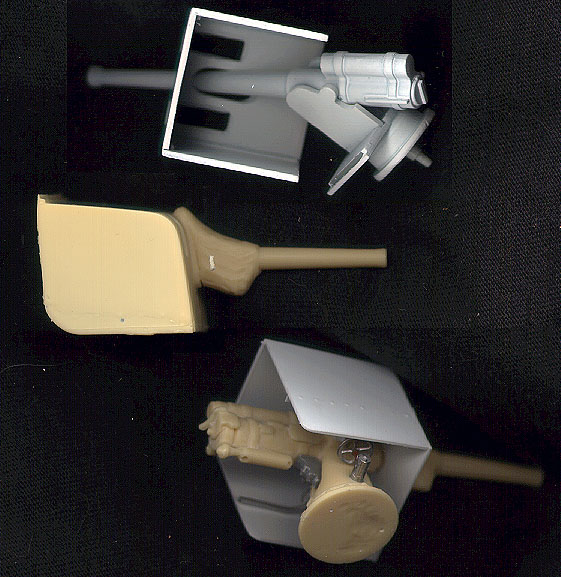
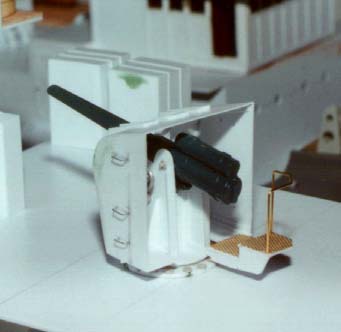
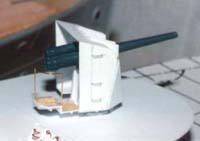
Mk.IX Gun on CP.I mounting
|
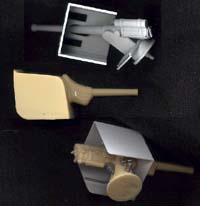
4" mounts: Kit , Sirmar, Scratchbuilt
|
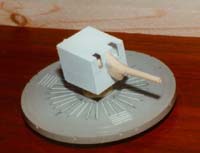
The kit provides a very basic 4" gun and a choice of two gunshields,
the CP.I or the CP.III. The only real difference is the CP.I has a flat
front, while the CP.III has a curve to the upper section of it. The gun
itself is in two pieces with a three piece base, and the shields are a
further three pieces consisting of a front/top and two sides. Very basic.
A simple operation is to open up the view ports in the front of the gunshield,
and this is what I did originally.
For those wishing to add more detail to their model, there are three
option at this point: The GLS 4" set, the Sirmar weapons set, or
to kitbash from the kit parts. For this mount I chose to use a combination
of the Sirmar gun and scratchbuild a new gunshield.
Using the drawings in John Lambert's Flower Class Corvettes book, I
drew the shapes of the top, sides and front of the gunshield on .020 sheet
styrene. After these were cut out using a steel edge and a new #11 Exacto
blade I embossed a line of rivets on the side of the shield by pressing
a push-pin on the inside of the shield at the height were the reinforcing
angle iron was to go. The view ports were then cut out from the top and
front and the four pieces were glued together.
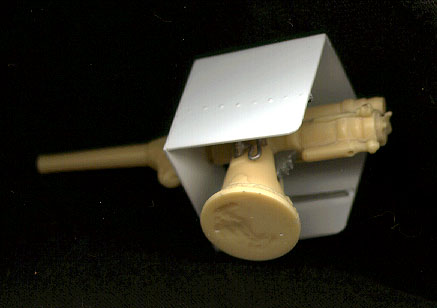
 The
Sirmar gun has pretty soft detail and I spent an evening cleaning it up
with a combination of files, Dremel Mini-Mite and Exacto blades. Sirmar
also include the two different types of giunshields, but they do so in
a different manner. They provide the breech and mount as one piece, and
the shield and barrel as a second. The idea is to join the completed breech/mount
to the shield. They also provide a metal barrel in case you choose to
display it with no blast bag. I carefully removed the gun from the CP.I
shield, leaving the blast bag intact on the end of the barrel. I then
drilled a hole at the correct height in the front of the gunshield for
the barrel (there is a small locator tab on it). The
Sirmar gun has pretty soft detail and I spent an evening cleaning it up
with a combination of files, Dremel Mini-Mite and Exacto blades. Sirmar
also include the two different types of giunshields, but they do so in
a different manner. They provide the breech and mount as one piece, and
the shield and barrel as a second. The idea is to join the completed breech/mount
to the shield. They also provide a metal barrel in case you choose to
display it with no blast bag. I carefully removed the gun from the CP.I
shield, leaving the blast bag intact on the end of the barrel. I then
drilled a hole at the correct height in the front of the gunshield for
the barrel (there is a small locator tab on it).
 Sirmar
also provide metal parts in the form of wheels, sights and various mounting
brackets. I used all of these on the breech assembly and set it aside
to prepare the shield for joining with the gun. I made angle brackets
from .010 x .060 strip and glued that over the rivet line. To make the
brackets that support the shield above the gun I glued two strips at right
angles to each other. When dry I added a fillet to the interior angle
and then carved a curve into the exterior angle. Another strip was glued
along the outside – voila, one curved support. These were glued to
the roof of the shield. Sirmar
also provide metal parts in the form of wheels, sights and various mounting
brackets. I used all of these on the breech assembly and set it aside
to prepare the shield for joining with the gun. I made angle brackets
from .010 x .060 strip and glued that over the rivet line. To make the
brackets that support the shield above the gun I glued two strips at right
angles to each other. When dry I added a fillet to the interior angle
and then carved a curve into the exterior angle. Another strip was glued
along the outside – voila, one curved support. These were glued to
the roof of the shield.
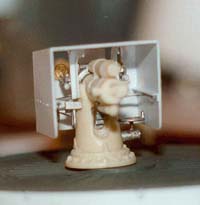 Time
now to put it all together. The barrel/blast bag is CAed to the shield
and the breech lined up inside and also CAed in place. The overhead supports
are CAed to the mount and Sirmar's metal supports join the mount to the
brackets on the side of the gunshield. Time
now to put it all together. The barrel/blast bag is CAed to the shield
and the breech lined up inside and also CAed in place. The overhead supports
are CAed to the mount and Sirmar's metal supports join the mount to the
brackets on the side of the gunshield.
Six months or so later I got the long awaited WEM Naval Colourcoat paints
and after a month or two of procrastination I had to try them on the gunshield.
I sprayed RN White on the entire gun and shield (and many other parts)
and set them aside for future use. For anyone building a model of a second
world war British ship these paints are highly recommended, and save the
guesswork in mixing colours. RN white is actually more of an antique white,
or white with a very pale buff or yellow tinge to it, and it is most noticeable
when placed beside the parts I had previously painted in plain old white.
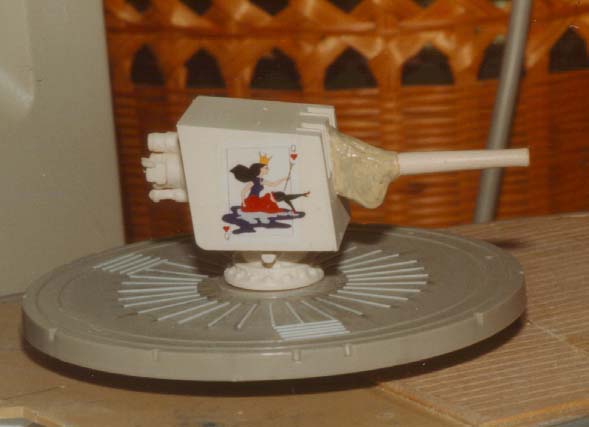
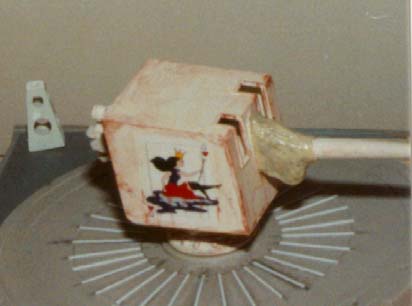
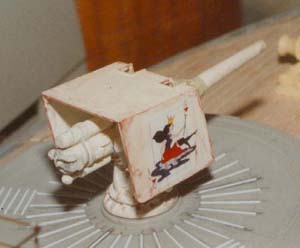
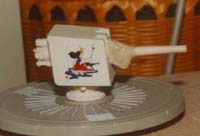 One
reason I wanted to do an RCN Flower is the artwork carried on the forward
gunshield, and HMCS Wetaskiwin has some of the coolest artwork around
on hers. It features a Disneyesque Queen of Hearts with her backside in
a puddle in an obvious play on the ship's name. Indeed, the Wet Ass Queen
was infamous in the corvette fleet. I have been lucky enough to have access
to photos of her emblem as well as a copy of the sketch used to create
the original and a postcard showing the colours used. All of these went
into creating a set of ALPS decals for use on my model. One
reason I wanted to do an RCN Flower is the artwork carried on the forward
gunshield, and HMCS Wetaskiwin has some of the coolest artwork around
on hers. It features a Disneyesque Queen of Hearts with her backside in
a puddle in an obvious play on the ship's name. Indeed, the Wet Ass Queen
was infamous in the corvette fleet. I have been lucky enough to have access
to photos of her emblem as well as a copy of the sketch used to create
the original and a postcard showing the colours used. All of these went
into creating a set of ALPS decals for use on my model.
 With
that sort of incentive, I just had to see what it looks like on the shield,
so I added the decals to it .. and in a further moment of irrationality
I weathered it in advance of the rest of the model. As I plan this to
be a radio controlled model, I couldn't use the excellent Rust-All line
of products as they as water soluable, therefore I used Testor's Model
Master Rust carefully drybrushed on. I think I went a little overboard,
but I can tone it down when I next paint something with the WEM White. With
that sort of incentive, I just had to see what it looks like on the shield,
so I added the decals to it .. and in a further moment of irrationality
I weathered it in advance of the rest of the model. As I plan this to
be a radio controlled model, I couldn't use the excellent Rust-All line
of products as they as water soluable, therefore I used Testor's Model
Master Rust carefully drybrushed on. I think I went a little overboard,
but I can tone it down when I next paint something with the WEM White.
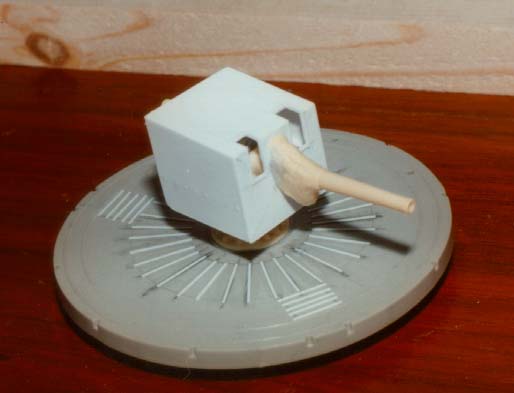
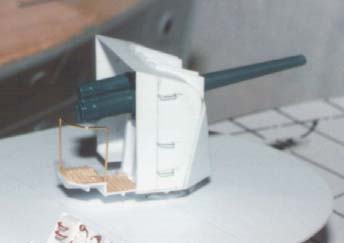
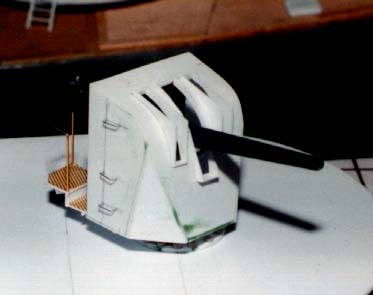
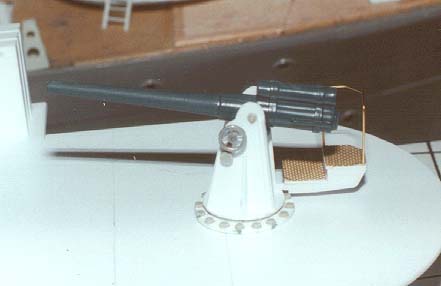
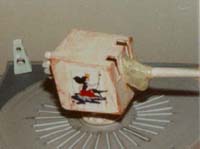
4" Mk.XIX on CP.XXIII mounting
The Mk.IX CP.I/III gun/mounting combinations were a stopgap and were
basically leftover from the First World War. When the final batch of Canadian
corvettes were built, they featured all new layouts, and a new, purpose
built gun and mount – the Mk.XIX on the CP.XXIII mounting. This had
the advantage of using fixed ammunition, as well as platforms for the
crew to revolve with the gun.
 One
of the things that decided me on trying to build a late war corvette was
the 4" Mk.XIX gun, it is different enough from the basic Mk.IX that
it would provide a bit of a challenge to scratchbuild. Once again John
Lambert's drawings were the basis of this work. I rescaled them to 1/72
and drew them on .020 styrene. One
of the things that decided me on trying to build a late war corvette was
the 4" Mk.XIX gun, it is different enough from the basic Mk.IX that
it would provide a bit of a challenge to scratchbuild. Once again John
Lambert's drawings were the basis of this work. I rescaled them to 1/72
and drew them on .020 styrene.
After cutting out the single piece top and front, two sides and a bottom.
I opened up the two viewing ports and the open slot for the barrrel. The
sides were glued to the bottom, followed by carefully affixing the top
of the roof to the side pieces. When this had dried I glued the bottom
of the front to the base, and then glued small triangles to the open angles
between the front and sides.
 The
viewing ports have squared off flanges to them to allow flat covers. These
were made by placing a piece of styrene in the opening and tracing the
interior angle. After cutting out the resulting curve the sides were glued
to the ports and a small top and bottom piece added. The gun slot was
down in a similar fashion. The
viewing ports have squared off flanges to them to allow flat covers. These
were made by placing a piece of styrene in the opening and tracing the
interior angle. After cutting out the resulting curve the sides were glued
to the ports and a small top and bottom piece added. The gun slot was
down in a similar fashion.
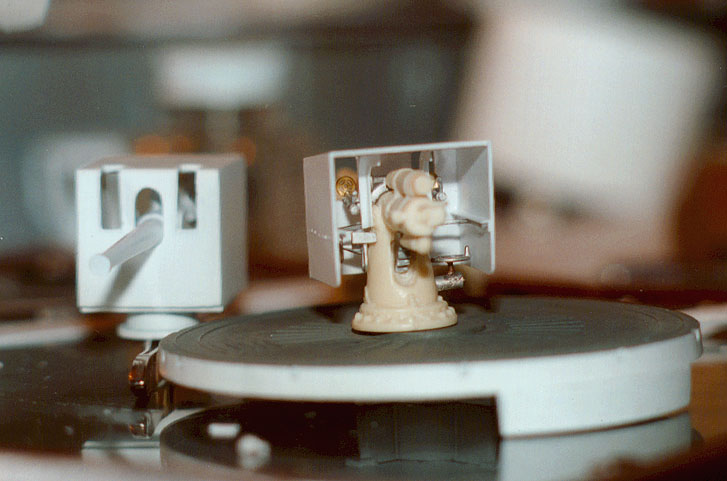
The final detail for the shield were the three rungs on each side. These
were made in the same fashion as those on the engine room skylight. I
used guitar string and bent the string on a pair of square tweezers. To
align them properly I drew a line down the sides of the shield, and then
at right angles to this. A hole was drilled at the crosspoint. For a drill
I used a piece of the same guitar string pushed into a dowel. One end
of the rung was placed in the hole, the other end was plotted and a second
hole drilled. Once in place a dab of CA locks it in place. The only thing
I would do different is to add the rungs before building the shield.
 For
the gun itself I used the kit 4" gun. I removed the tampion from
the end and tossed out the three piece base. Returning to Lambert's drawings
and some photos I came up with a reasonable mount. The uprights have right
angle supports at their lower extremity and also have angle brackets along
the rear. The gun needs to have its pivot point moved back, therefore
I cut off the molded on points and drilled holes were the new one should
go. To attach the gun to the supports I used two of the kit stanchions,
with the wide base used as a 'nut/bolt' in the hole. Leftover wheels were
added as well as some rod to portray the training and elevating gears. For
the gun itself I used the kit 4" gun. I removed the tampion from
the end and tossed out the three piece base. Returning to Lambert's drawings
and some photos I came up with a reasonable mount. The uprights have right
angle supports at their lower extremity and also have angle brackets along
the rear. The gun needs to have its pivot point moved back, therefore
I cut off the molded on points and drilled holes were the new one should
go. To attach the gun to the supports I used two of the kit stanchions,
with the wide base used as a 'nut/bolt' in the hole. Leftover wheels were
added as well as some rod to portray the training and elevating gears.
At the bottom of the supports is a disc sitting on top of the remainder
of the 20mm Oerlikon base as a spacer (like a pair of washers). This sits
on a larger disc with many pseudo bolts around its perimeter.
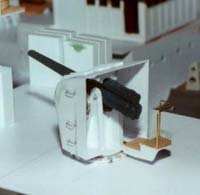 The
platform at the rear should really be open mesh, but I didn't trust myself
to not damage something that fragile. Therefore it was made from sheet
styrene and is attached to the inside of the right hand gun support. I
couldn't quite figure out this attachment, so it is best guess. To the
top of the platform I added some brass mesh and also a rail of .017 brass. The
platform at the rear should really be open mesh, but I didn't trust myself
to not damage something that fragile. Therefore it was made from sheet
styrene and is attached to the inside of the right hand gun support. I
couldn't quite figure out this attachment, so it is best guess. To the
top of the platform I added some brass mesh and also a rail of .017 brass.
I still have to add the sights as well as affix the mount to the shield,
but this time I will paint it first and then join the pieces together.
NOTE: ALPS Decals for HMCS Snowberry's gunshield are still available
by sending a self-addressed envelope and an IRC for postage. Contact
me for more information – Wetaskiwin is not available, but other
Flowers will be available upon request.
|