Matchbox/Revell Flower Class: Pt.6
RCN Minesweeping Winch
By Bob Pearson
|
 |
The first 54 RCN Flowers were fitted for minesweeping, and it was the
construction of this winch that determined that I would ultimately build
an RCN corvette. As previously mentioned the kit was basically completed
when I started to go back and accurize the various details. The ongoing
battle was to determine which Flower to build. I wanted to do an RCN Flower,
but I didn't feel like doing major modifications to the kit, so the decision
was made to try and build a minesweeping winch, and if it turned out,
I would then convert the kit.
 I
began by scanning and rescaling the drawings of the winch in AOTS:
AGASSIZ, this gave me 1/72 templates to work from. The first actual
construction was to construct the wooden platform upon which the winch
was mounted. Once this was done I noticed that the entire thing would
be covered by the metal baseplate, so wasn't really needed. An 'L' shaped
base was then cut from .040 styrene. The four uprights were cut out, with
the various openings roughedt out. One of these was then completed, and
used as a template to shape the other three. All of these were glued to
the base. I
began by scanning and rescaling the drawings of the winch in AOTS:
AGASSIZ, this gave me 1/72 templates to work from. The first actual
construction was to construct the wooden platform upon which the winch
was mounted. Once this was done I noticed that the entire thing would
be covered by the metal baseplate, so wasn't really needed. An 'L' shaped
base was then cut from .040 styrene. The four uprights were cut out, with
the various openings roughedt out. One of these was then completed, and
used as a template to shape the other three. All of these were glued to
the base.
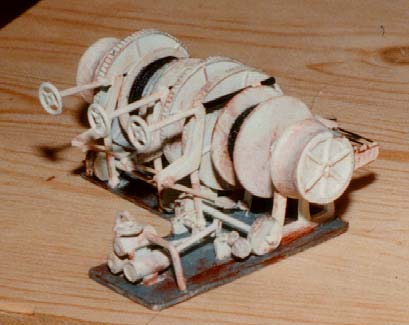
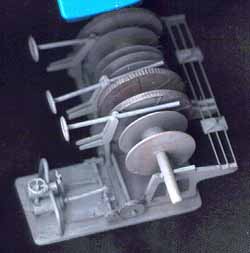
The items I really wanted to build were the three large wheels with
gears on their outside diameter. I started by drawing a circle on .040
styrene and marked the centre. A hole was added to the centre and the
circle was roughly cut out using an exacto knife. The resulting disc was
then chucked into my Dremel and sanded down to the necessary diameter.
Two more discs were cut out and placed in the dremel with the original
piece and all three were sanded to the same size. The stiffening radials
were added from .020 x .010 styrene, and a strip of .060 x.010 was run
along the outside diameter. To represent the geared teeth on the outside
I embossed some aluminum foil using the finest serrated edge of a medicine
bottle I could find. This was then cut on a pane of glass using a steel
edge and CAed to the outside of the wheel.
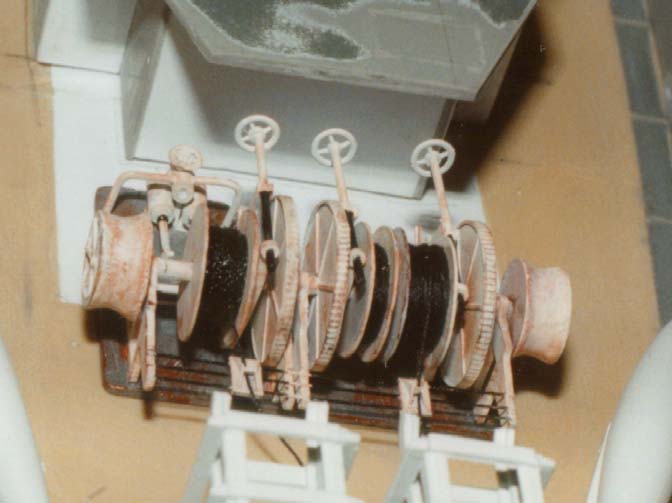
 The
three reels were done in basically simiar fashion, but using .020 styrene
for the main shape. Spacers were placed between them - two wide and one
narrow. All six wheels and reels were then placed on an axle made from
a section of sprue. It would be advisable to paint these items before
attaching to the axle .. and definately recommended that the wire be added
to the reels at this point as well - you guessed it, I did both a lot
later in the operation. The
three reels were done in basically simiar fashion, but using .020 styrene
for the main shape. Spacers were placed between them - two wide and one
narrow. All six wheels and reels were then placed on an axle made from
a section of sprue. It would be advisable to paint these items before
attaching to the axle .. and definately recommended that the wire be added
to the reels at this point as well - you guessed it, I did both a lot
later in the operation.
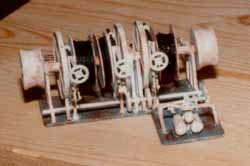
Below the main axle is a smaller one that engages the main wheels. The
four small gears on this one were made by using a standard hole punch
and .040 styrene. These had the aluminum foil gears added and then were
glued to a length of the rod included in the kit.
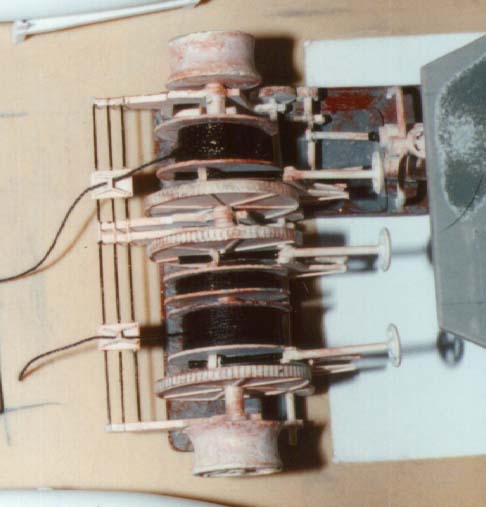
 The
small axle then engages a final axle which is driven by two pistons. This
axle was from yet more rod, with the pistons being represented by lengths
of the stanchions. The piston cylinders were sprue with .010 wrapped around
to increase their diameter. The pistons and cylinders were glued to the
base and piping added to it as well as a handwheel from somewhere or other. The
small axle then engages a final axle which is driven by two pistons. This
axle was from yet more rod, with the pistons being represented by lengths
of the stanchions. The piston cylinders were sprue with .010 wrapped around
to increase their diameter. The pistons and cylinders were glued to the
base and piping added to it as well as a handwheel from somewhere or other.
About now I made an error in wanting to see the thing glued together,
therefore the main axle was glued in place and small plates added to cover
each one where it joins the uprights. These were made by embossing thin
styrene over a pin and then cutting each piece about 2-3mm from the bump
in the centre. Wherever an axle comes in contact with an upright these
were used.
 The
smaller set of gears was then placed between the pistons and larger gears,
with care being taken to insure that all three were in contact where required. The
smaller set of gears was then placed between the pistons and larger gears,
with care being taken to insure that all three were in contact where required.
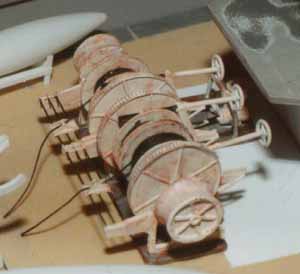
The front of the winch has three rails with two movable guides for the
actual minesweeping cables. These guides were made using guitar string.
Not sure of the diameter, but I would guess it to be .017 as that is one
of the sizes I use. The guides were made from small rectangles with two
bent triangles glued on each edge. These were joined in the centre by
a section of .020x.020 styrene, leaving a gap below for the wire to pass
through.
On the outside of the main axle are two drums used for warping other
lines. After trying to find something I could use for these, I finally
settled on some hardwood plugs used for filling holes in furniture. Using
the Dremel I ground the outside to a curved shape and also recessed the
outside edge. Styrene strips were added to the flats and a section of
tubing placed at the very centre.
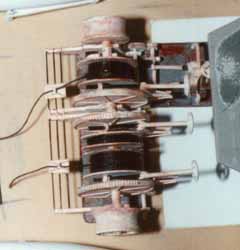 The
item that gave me a lot of trouble deciding on what it looked like are
the brakes for each wheel. None of the drawings clearly show exactly what
it looked like, so I first just added an upright column with two 'L' shaped
levers connecting to a rod at the top. This rod would tighten a band against
what I now assume to be another set of drums. However I just added a vertical
strip to connect the rod and the baseplate of the entire mount. The
item that gave me a lot of trouble deciding on what it looked like are
the brakes for each wheel. None of the drawings clearly show exactly what
it looked like, so I first just added an upright column with two 'L' shaped
levers connecting to a rod at the top. This rod would tighten a band against
what I now assume to be another set of drums. However I just added a vertical
strip to connect the rod and the baseplate of the entire mount.
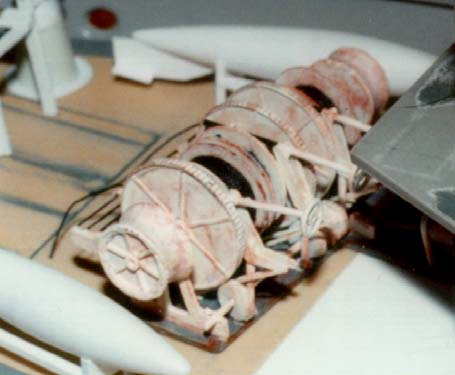
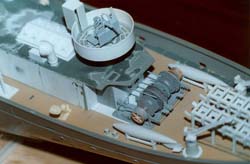
With the winch basically complete I just had to get ahead of myself
and sprayed it with a coat of Testors Neutral Gray. In this state it sat
for almost four months...... then the WEM Colourcoat paint arrived and
I resprayed it with RN white. I would have weathered it using Rustal,
however I plan this for radio control, so used Model Master Rust instead.
The 'wires' were black thread, and getting it on the reels was a real
pain. I was able to loosen two of the reels and rotate them to wind the
threadd on them, but the third was done by threading a needle and passing
it around, and around, and around the reel. Two things would have made
this easier. One/ use a larger diameter inner spacer – there is no
need for scale appearance when it is covered in thread. Two/ wrap the
wire BEFORE gluing the axle in place.
 To
go along with the winch I also made new davits, floats and racks for the
floats. I made my own drawings based on the AOTS ones and got to work. To
go along with the winch I also made new davits, floats and racks for the
floats. I made my own drawings based on the AOTS ones and got to work.
Each float started life as the wing tank of a Hobbycraft 1/72 CF-100.
The fins were removed and a 1cm section was cut from the middle of each
tank. The two halves were then joined together and a lot of sanding faired
it to shape. New fins were added from .010 styrene. I still have to add
the flag, bridle and hook on top.
The rack was made from angled styrene. At the time I made them, I didn't
have any actual angle shapes, so made my own by gluing .010x.060 styrene
together.
 The
Davits were pretty straightforward, with the bases being provided by the
kit Oerlikon mounts. These were extended by adding a 7mm spacer to the
top and gluing styrene around it. The works then being sanded smooth.
The hand gears were guitar strings. I also added small pins in the bottom
of the davit to allow me to move them until I decide how I want them mounted. The
Davits were pretty straightforward, with the bases being provided by the
kit Oerlikon mounts. These were extended by adding a 7mm spacer to the
top and gluing styrene around it. The works then being sanded smooth.
The hand gears were guitar strings. I also added small pins in the bottom
of the davit to allow me to move them until I decide how I want them mounted.
Conclusion
All-in-all I'm quite pleased with how the winch turned out. True there
are many details I would do differently if I was to do it again, but it
should add a lot to my model of Wetaskwin.
|